Saturday, August 2, 2014

F-Engrave V-Carving Projects

V-Carving

Back a few years ago I did a speed comparison on a few CAM programs for generating g-code for cnc machines. Since then I have done a lot of machining using those programs, but also some work with a program called f-engrave. f-engrave is a python program that produces tool path for a machining process called v-carving, and well as general engraving.


V-carving, as seen above, is a process that produces 3D carved features in a work piece using a tapered bit. V-carving is often used for 3D carved signs and is especially popular for carving block lettering. V-carving produces high quality engravings with greatly reduced cutting time in comparison to 3d contouring, however, it is generally limited to features that have relatively narrow strokes. The width of the stroke is determined by the depth of the cut using a v-shaped bit.

Vetric's VCarve software is a popular software suite for producing tool paths for v-carving. VCarve Pro isn't as expensive as some CAM software, but I can't justify the purchase price for hobby use. There are a few other commercial software suites for producing v-carving tool paths, but the prices are similarly aimed at commercial sign makers and the like ($500-$5000).

F-Engrave

So, some time ago I started using the v-carving features of f-engrave to make some Christmas gifts. As far as I'm concerned, f-engrave does a great job producing tool paths. I found that the most useful workflow for producing high quality engravings was to create a black and white image of the project in a graphics application like Inkscape or Adobe Illustrator, convert to a bitmap, and import into f-engrave. f-engrave uses a bitmap to vector conversion tool called potrace.

Potrace does a pretty good job converting the bitmap to a vector. However, if you have done much work converting bitmaps to vectors you will know that without the right resolution bitmap and the right settings in the convertor you can end up with one of two problems. First, if you start of with two low of a resolution bitmap, then you end up with a jagged vector image. Second, if you have too of a high resolution bitmap and the wrong setting in the converter then you end up with a vector representation with hundreds of thousands of line segments.

In f-engrave (up to version 1.36)  if you have a vector image that has many line segments the v-carving calculations begin to take a long time. For example, an unoptimized vector image could take my relatively speedy intel i7 machine 30 minutes+ to calculate the v-carving. However, it I take the time to tune the resolution of the image and the potrace setting f-engrave would only take about 5 minutes to do the same job. This became a bit of a frustration as I would find myself spending and hour or more to get the settings right so the image caved well, but didn't take forever to calculate.

I should explain that it is possible to  import a vector image as a dxf directly, but the many different versions of dxf formats makes this difficult. Besides, how many good graphics programs produce good dxf files without significant effort. I decided that what I needed was the ability to import any old bitmap image even a high resolution and not have to wait forever for the tool paths to be calculated.

I knew that f-engrave used a somewhat brute force algorithm, but I wondered how much faster it would run it I were to re-write the code in C++ or java. Thankfully,  I didn't take the time to rewrite the code in c++. I'm sure that it is true that the algorithms as they existed would run faster in c or c++ than they did in python, but often a change in the algorithm will make a much for significant difference.

Due to the fact that f-engrave is a single file python program it is really easy to dive in and see how the program works. I love this as it was fairly simple for a weekend warrior programmer like myself to modify the program and implement some improvements. I was able find a chunk of the code that was taking a large portion of the computation time that was in a recursive loop and came up with a way to do some pre-processing to eliminate the need for most of it. This lead to a huge increase in the speed of the program. Below you can see the speed improvement from the change:


Unfortunately, it took me about a year to remember that I needed to get this code back to the developer of f-engrave for the community to get the improvement. I recently did that and hopefully in the coming weeks a new version of f-engrave will be released with this improvement.

The result with the speed improvement is that I can now import a high resolution bitmap image from whatever tool I used to create it and get a high quality toolpath out of f-engrave quickly. I'm happy, and I hope that many of you who read with will be happy about it too. 


Tropicana Orange Juice Lid

Having recently developed some packaging for liquid products at work, I'm often now interested my new packages in the grocery store. Today, while in the refrigerated section at Walmart, I saw this neat new lid/pour spout on one of the Tropicana bottles:
 
 The part about this that is neat is that the injection molded lid just has a snap fit that holds it onto the extrusion blow molded bottle. We are planning on reusing the container as a pitcher once we are done with the OJ. I also love the pull off seal that is all one injection molded piece with the lid. I was a bit surprised to see that the snap on lid is actually a different part. However, I'm sure it would be very difficult to have molded it in as a single part with the seal.

Anyway this may have been a bit boring, but I found this lid quite interesting.

Saturday, August 18, 2012

Co2 Car Races

The Race Day Has Come!!!!

Well I couldn't wait for the race day for our Co2 Cars to come. I spent the last few hours before the race thinking about how I could further reduce the friction of the car. But At some point you just can't do much more.  Here is my completed car with post race dings on the nose:
So I suppose you would like to see some of the video?


I ended up finishing second in the race. The first place car was cut on my machine, but the design was a bit lighter. My car was 2.9 oz, the first place car was 2.3 oz, so it isn't surprising that it won the rare. I suppose next year I'll worry more about weight than the aerodynamics.

I'll post some more in a day or two when I have some more time.

Saturday, August 11, 2012

How Fast is your CAM Software?

So I have been doing quite a bit of surfacing lately with co2 car I have been working on. Surfacing calculations were consuming a significant amount of my time. So I thought I would make a comparison of the apps I have used. First we will look at pycam.

The Test Parameters


The Test file I will use for comparison is one the co2 car designs from the last few posts on this blog. This file is in stl format and has about 50,000 triangles. The model is about 2" x 10" x 2". The operation is zigzag surfacing the model with a .250" ball end mill and a .015 stepover.

Here is the STL file

PyCAM

Pycam has some interesting option that are intriguing to try. However I found that the amount time was unreasonable for my application.

Pycam failed the task all together. After consuming 6gb of memory and all 8 of my cpus cores for an hour it finally finished the first 8 passes, then locked up the computer. Before the crash the progress bar said there was more than one hour remaining. I don't have time to wait that long.


HeeksCNC (OpenCamLib)

Next OpenCAMLib in HeeksCNC. OCL performed the task in about 5 minutes with two triangle intersection errors. See the following pictures. This is definitely much better than PyCAM, however, I had to verify the resulting gcode to detect and manually fix the triangle error that would creep into the code. Some of these errors on different operations would cause the tool to dive through the workpiece. So, verify your code before you run it.

Here is the HeeksCNC File


FreeMill (free VirtualMill product)


Freemill produced the requested toolpath in 3.17 seconds. No errors. I'm quite impressed with the speed, but I have not compared the resulting code to see if the stl file had been simplified before the code was generated.

Conclusion

When doing hobby stuff at home, nothing beats free. In that reguard OpenCAM lib takes the cake as the best free surfacing tool that I know of. Please feel free to let me know of something better.

When doing work, rather than play, it sure it nice to have some tools that reduce wait time from a few minutes to a few seconds.  The VirtualMill product is expensive enough that I would need a pretty darn good reason to purchase it for faster CAM calculation time.

It would be nice to see what could be done to narrow the gap between the open-source solutions and the commercial tools. I would love to see some additional examples of other software creating the same operation in CAM programs. Please feel free to use my model as at tool to compare other solutions. Here it is.

Sunday, August 5, 2012

Share your toys

Sharing is Fun

So one of my other objectives with this project was to share my toys. Like I have said in previous posts, I'm not really out to win the race, I just want to have fun. If anybody else in race wants to use my tools to cut out their car I would be more than willing to help out. After all, it just means I get to have some more fun using my machines :)

So I wondered how many of the other men at church had access or the skills to use CAD software to design a car to be cut on my machine. There are perhaps one or two that could make their own model. But for anybody else it isn't really an option to learn how to use some of the free CAD software to generate a complex contoured car body shape in a short amount of time.  One option that is free and still pretty easy to use is Autodesks 123d CAD software.

However, it is pretty realistic to model a car out of clay and other sculpting materials. I figured that if someone wanted to sculpt a design is would be easy to make complex shapes using clay and then all that we would need to do is digitize the clay model and then we could cut it on the NC machine.

How to Make Clay Digital

So There are several ways to digitize a clay model these days. Most all of them use some method to create a point cloud from the surface of the part and then mesh that point cloud into a digital surface that is close to identical to the original. There are laser scanners, touch probes, X-Ray tomography, etc.. but there was one method that looked very easy and didn't cost any money. Autodesk 123d Catch.

123d Catch- Beautiful, but not very accurate


124d catch uses lots of digital photos of the object from different angles to create a textured mesh of the original object. Here are the results of my attempt. When you get to the site select the 3d button below the model. The model is beautiful because the texture is created from the photos, but the mesh is not very accurate. Also it bothers me that the calculations are done on the cloud. I would rather wait longer and do all of it on my computer. I'm sure that they do it in the could to gain ownership of the models.

Touch Probe it is

After discovering that 123d Catch would not provide the accuracy I wanted I looked into making a touch probe for my machine. I ended up making a touch probe with a piezo buzzer and an Arduino board. More details on that sensor will be in another post. Here are the results from that experiment:

And here is a picture of the resulting mesh next to the original model
Not Quite the faithful reproduction I was expecting, but it is a work in progress. Also, not all the part was sampled.

CNC Machining the body

Ok, here is where the CNC fun starts. I made sure to design the body with the fact that I would be contouring the body on my CNC machine with a 0.250" ball end mill. Also, the design of the car required that I be able to machine the car at least from the left right and the bottom. I ended up building a fixture out of some scraps I had in my scrap bin.

At the left side There is an expanding mandrel I made from a piece of 1" hex stock steel and a rubber expansion nut. The middle school car is placed loosely on the end of the mandrel. The real stock wood fits all the way up to the steel shoulder. The expanding rubber section holds the wood on the steel shoulder and prevents the block from rotating. The hex shape allows me to rotate the part around the longitudinal axis as 60 degree increments. The hex mandrel is located against the two dowels in the fixture. You can see the block fixtured in the background of the second picture.

I used HeeksCNC to generate the tool paths to cut out the part. Here you can see the part positioned in the 6 orientations it will be cut in. With the six positions every spot on the car should get a good change to have the tool cut the surface at a close to normal direction to prevent needed to use extremely close contouring lines. 
And here is a screen shot of one of the finishing profiles.
And finally at video of one of the programs.
Note that I will manually cut the front of the car with a band saw and create a good looking tip to the car.

CO2 Car Body Design

After I picked up the CO2 car kit from the scout shop I started work on the design of the body. I use Alibre CAD here at home and for consulting work. It is proficient for most mechanical CAD work I do, but I have not been impressed by it's surfacing capability. But hey nothing in in my home use budget is going to compare to software like Unigraphics NX (read >$30,000).

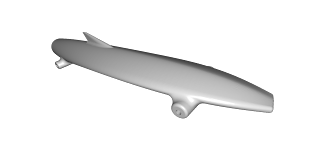
So I whipped up a few lofted and swept profiles and created this model. 

Co2 Car body Design

 I ran the simulation in Project Falcon creating these results:
The car as a coefficient of friction of .34 and a drag force of .17 newtons a 60 mph. The coefficient of drag is not really all that great, but it is difficult to get much better because the hole where the Co2 cartridge goes creates a large low pressure zone with lots of eddy current (seen as the blue traces in the picture). The .17 newtons of drag is the best result I came up with out of all the preliminary designs I did. So I'm fairly confident this is a near optimum shape.

But What about mass? isn't that the most important parameter? Well if you look at the bottom of the car, you will notices that behind the front wheels the main portion of the body is hollow. I didn't spend as much time reducing weigh as possible, but I didn't do any stress analysis to determine how thin I could go, so the design is a bit sub par in that aspect.

However the point is that this is for fun, and I'm having fun with it up to this point.